I originally wrote this guide for a WP Engine Support Garage article, as WPEngine utilizes the Google Cloud Platform which will block sending e-mail over specific ports, and I wanted to provide an easy to use alternative. The article eventually got published on a co-workers blog, but I decided to publish it here as well. More visibility is better right?
Google allows only Google Apps to send email through ports 465 and 587, and prohibits any service from sending mail through port 25.
Many email providers have created better ways of sending or relaying email through alternate ports or APIs. But Microsoft Office 365 among others are left in the lurch when it comes to sending outgoing emails through Google Cloud servers. If you’re one of the many affected by this issue, this guide will help you configure email through Amazon Simple Email Service (SES) to send outgoing emails from your WordPress site.
This post is only going to cover sending e-mails out of your WordPress site, so password resets, transaction confirmations, and other similar types of e-mails. You could in theory use this and a mailing list plugin, but I recommend using an actual service for your mailing list such as MailChimp.
Setup your DNS Records
The first step is to validate your domain with the SES service–This requires adding DNS records with your DNS provider. The process is the same with any DNS provider, but we are using CloudFlare’s DNS dashboard in this example.
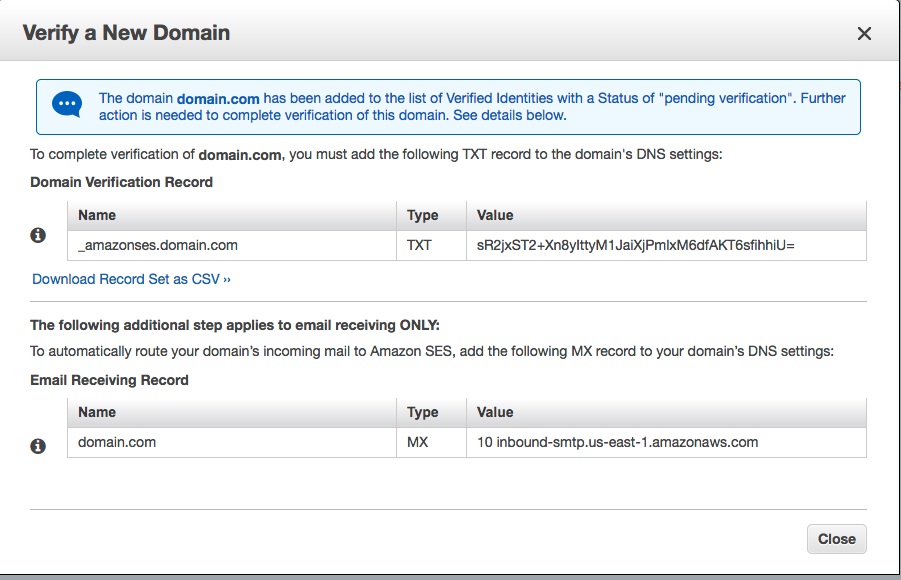
Log in to the Amazon Web Services console and navigate to the SES page. Then click “Domains” from the left-hand navigation menu. Click “Verify a new domain” and enter your domain name. If you want to utilize DKIM then you can also generate DKIM signatures in this step. On the next screen you’ll be given your DNS records to set up within your DNS provider.

You can take the Type and Value fields from these records and paste them directly into your DNS provider’s dashboard. In our CloudFlare example simply log in, choose your domain name, and select “DNS records.” In the dropdown menu to select a type of record, choose “TXT” – then in “Value” enter the “Name” field from the Domain Verification Record, and in the box next to it, enter the “Value” field. Once Amazon SES has been able to detect the records have been added, your domain is verified for use with their service.
If you utilize an email provider for your domain’s emails such as Google Suite, Outlook365, or another email server then you do not need to input the MX record and will leave your current MX records as is. This means only your outgoing emails will be handled by Amazon SES.
Create an E-mail User
Now that Amazon has been able to verify our domain for sending email we need to create an SMTP user for our WordPress site to use for sending email. On the SES console home page, click “SMTP Settings” from the left-hand navigation. Then click the “Create My SMTP Credentials” button. Leave the default username as-is and click “Create.”
On the next screen be sure to download your login credentials–we will need them in the next step. To do this, just click “Show User SMTP Security Credentials” and you can copy and paste them into your text editor of choice.
Install & Configure an SMTP Plugin
Now that we’ve configured Amazon SES it’s time to configure your WordPress install to utilize the service. We’re going to be using the Easy WP SMTP plugin for this step. You can install this plugin by going to your plugins page in the WordPress Admin Dashboard of your site and going to Plugins > Add New > search for Easy WP SMTP > Install. Once installed you’ll want to activate the plugin so we can configure it.
Google Cloud servers have ports 25, 465, and 587 disabled by default, but you can still use port 2587.
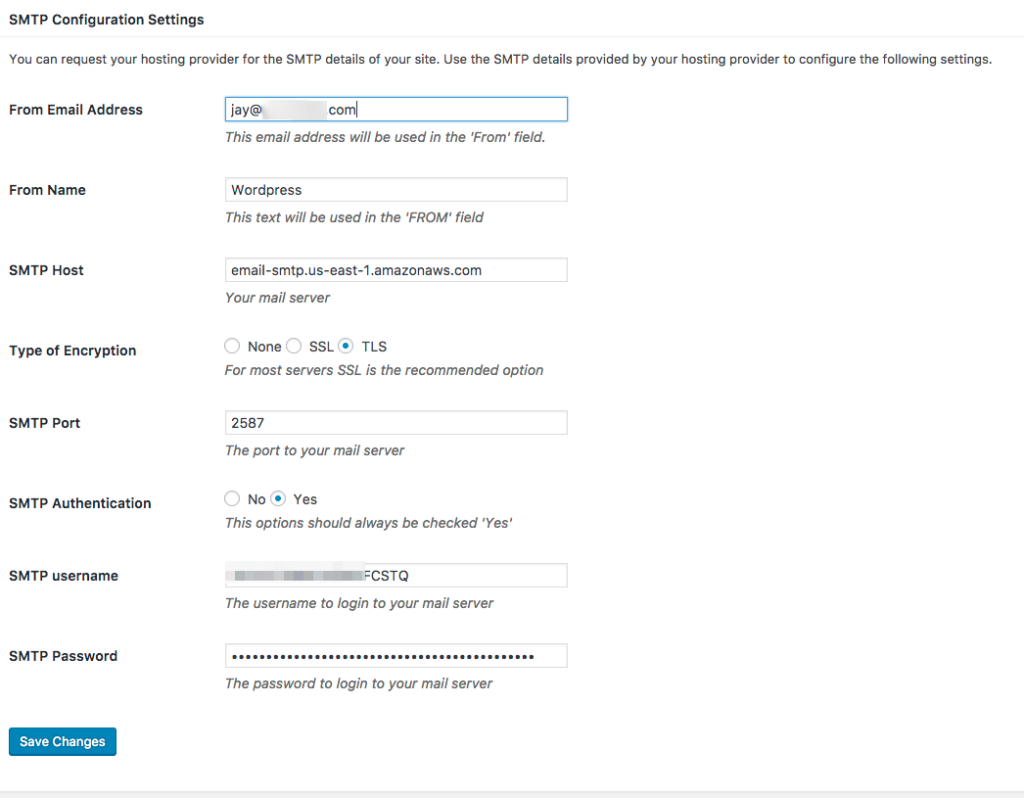
- In the “From” field, put an email address you want WordPress to send email from. This could be anything as long as it has your domain name in it.
- For the “Name” you can put anything you want your emails to show as from.
- You can get your SMTP Host at the Amazon SES SMTP Settings page. If you setup SES in the US-East-1 region it will be: email-smtp.us-east-1.amazonaws.com.
- Ensure that TLS is selected for the Type of Encryption setting.
- For the sending port, input 2587.
- Check the SMTP Authentication to yes and input your SMTP username and password that was created in the previous step.
Your settings should then look similar to this:

Send a Test E-mail
Now that your settings are configured, you’ll want to send a test email to make sure it’s working right. Right now your SES account is still in Sandbox mode, so we need to configure an email address to send email to first. In your Amazon SES console, click “Email Addresses.”
Click “Verify A New Email address,” enter in the email address you want to verify. Then click the “Verify This Email Address.” This will send an email to the specified email address. You’ll need to click the link within it to verify your email address. If you do not verify your email address, Amazon won’t send the email.
Once verified, head to the Easy WP SMTP Settings page in your dashboard and scroll down to the “Testing and Debugging Settings” section. Input the verified email address, a subject and message, and then send. Check your email to ensure that it was delivered. If it was not delivered, confirm your email address is validated and your port settings.
Request Amazon release Sandbox Mode
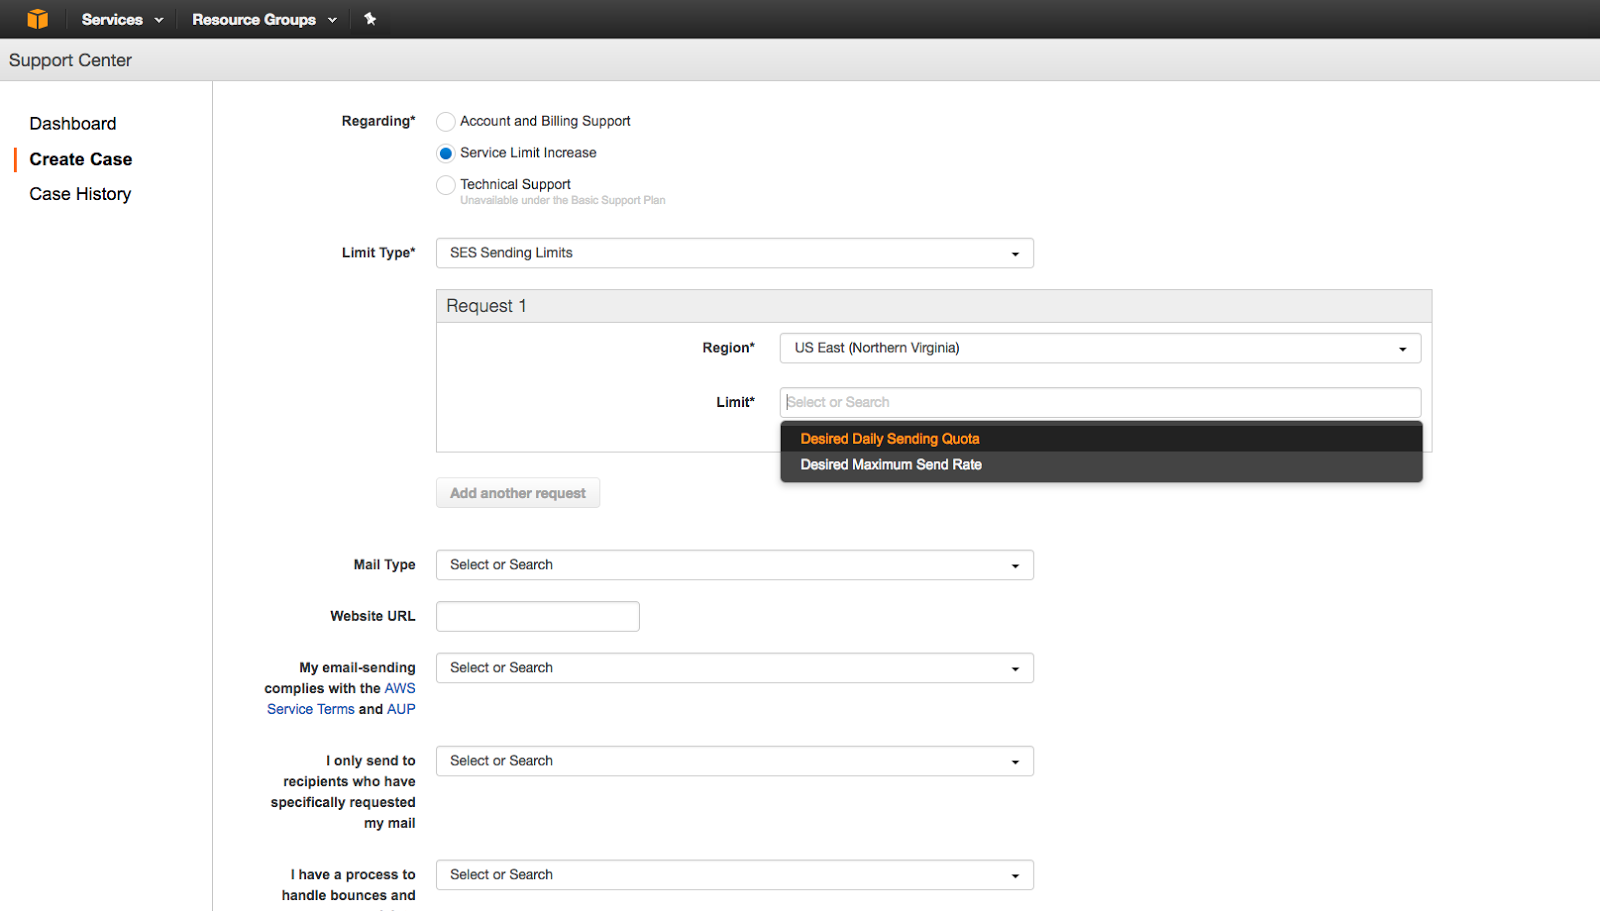
Amazon keeps your SES service in what is called Sandbox Mode which requires that all email addresses you send to be verified before email deliverability can be achieved. We need to request Amazon enable production access to SES by utilizing their support system for a Service Limit Increase.

Ensure “Service Limit Increase” is selected, and “Limit Type” is set for “SES Sending Limits.” In “Request 1” choose the region you setup SES for and then choose “SES Production Access.” Fill out the rest of the boxes and submit the request. Amazon typically takes 24 hours to grant access to Production Mode for SES.
Once they have taken SES out of Sandbox mode you should be able to test your site’s emails to ensure they’re delivering properly. Be sure to test any eCommerce emails, contact forms, or transactional emails. You should also ensure that your contact forms have a captcha configured. This ensures spammers are not able to abuse your forms, which in turn abuses your SES service.
That’s all there is to it! I hope you have found this useful. If you have any questions don’t hesitate to reach out!